-
- Video Converter
 Netflix Video DownloaderTry
 iTunes M4V ConverterTry
- Audio Converter
 Apple Music Converter Try
 Spotify Music Converter Try

If you are running macOS 10.13 High Sierra, you may encounter problems when using M4VGear for Mac to convert iTunes videos.
Currently we are working on the incompatibility issue with the latest version of macOS 10.13 but the exact date to fix the problem is TBC. Here are two solutions for you:
1) Recommended - We advise you to try our Windows version. If it works well for you, we can help switch the program from Mac version to Windows version, for free. Please contact us at support[at]m4vgear.com (replace [at] with @ before sending e-mails).
2) Revert your macOS 10.13 High Sierra to 10.12 Sierra, which is fully supported by M4VGear for Mac. In the following guide, we will show you how to downgrade macOS 10.13 High Sierra to 10.12.
But we get started, please make sure to backup your Mac with Time Machine, which can be found by go to Apple Menu > System Preferences >Time Machine. When the downgrading is finished, you can easily restore the backup. Now let’s come to the detailed steps:
Note: Please keep your Mac connected to internet via Wi-Fi or Ethernet during the whole process.
The first thing we should do is to download macOS 10.12 Sierra from the Mac App Store before we erase macOS 10.13 High Sierra from our computer. You can find it in your purchase list; otherwise, just search for it in the Mac App Store.
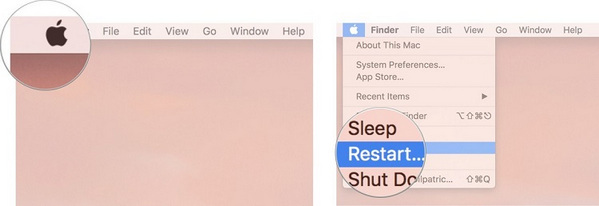
Step 1: Click Apple icon on the upper left of the screen and select Restart. While the Mac is restarting, press Command+R.
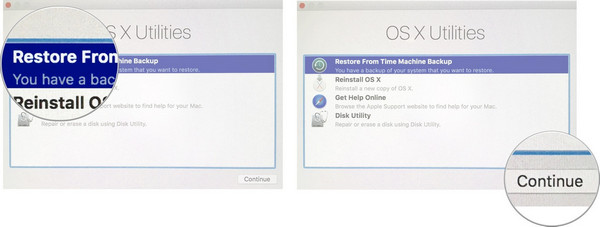
Step 2: Click Disk Utility in the OS X Utilities selector. Press Continue and then click Startup Disk.
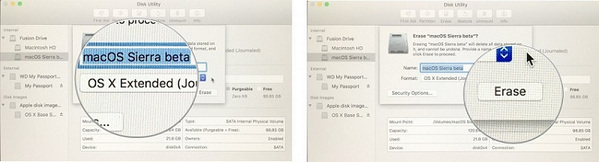
Step 3: Click on the Erase tab at the top of the window. Enter the name of macOS High Sierra and choose Mac OS Extended from the Format list. Click Erase.
Step 4: Quit Disk Utility from the dropdown list on the upper left of the screen and go back to OS X Utilities selector.
Step 1: Click Apple icon on the upper left of the screen and select Restart.
Step 2: While the Mac is restarting, press Option on your keyboard and then you will be enabled to select a startup disk.
Step 3: Select macOS Sierra from startup disk options and then macOS 10.12 Sierra will start being installed on your Mac.
Step 4: Press Continue and your Mac will restart when the installation of Sierra is completed.
Step 1: Restart your Mac and hold down Command+R. Click Restore from Time Machine Backup in the OS X Utilities selector and then press Continue.
Step 2: Select the Backup source for where your Time Machine backup is stored, OneDrive, for example, and then click button Continue.
Your Mac will begin restoring from the Time Machine backup and then reboot. The process may take a while. Just be patient and do not interrupt the process until it’s all finished.
Soon you will find your Mac has been successfully and safely reverted from macOS 10.13 High Sierra to macOS 10.12 Sierra.